
This content was originally published on OldHouseOnline.com and has been republished here as part of a merger between our two businesses. All copy is presented here as it originally appeared there.
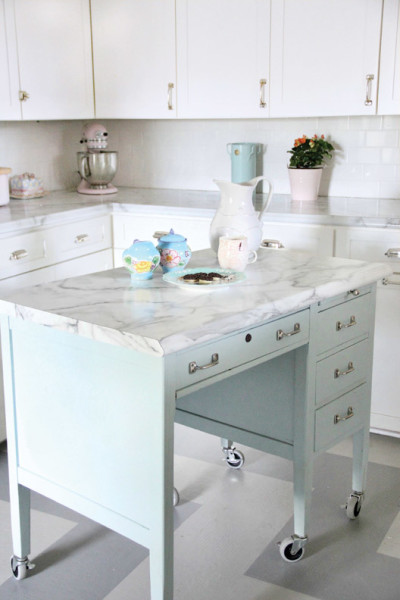
In kitchens where counter space is at a premium, an island can be a lifesaver. And it’s not without historical precedent-central worktables appeared in kitchens starting in the 19th century. (Find out more here.) If your kitchen’s small dimensions (and an even smaller budget) preclude a hefty built-in island, you can create your own from a salvaged piece of furniture. Here, blogger Lesli DeVito shares how she transformed an old school desk into a serviceable kitchen island for her 1880s farmhouse.
How To Make It
1. Choose a piece of furniture
Your options are virtually limitless: desk, dresser, buffet, sofa table, or even something quirky like an old seed counter or printer’s table. But keep the dimensions in mind: You’ll want between 3² and 4½’ of space on every side of the island-this will keep the counter within easy reach without impeding traffic flow.
2. Paint it to match
This step is optional if you already like the way your furniture piece looks in your kitchen. In Lesli’s case, she wanted a soothing blue to provide a gentle contrast to her white cabinets, so she sanded the desk with a detail sander and applied two coats of Benjamin Moore’s Gossamer Blue in a semi-gloss finish, sanding lightly between coats and topping it with a clear satin varnish. She also replaced the hardware with Restoration Hardware pulls that fit the existing holes.
3. Adjust the height
An island should be roughly the same height as your counters (36³ is standard), so if your furniture piece is shorter, you’ll need to make up the difference by adding extra material on the bottom. Because Lesli wanted the ability to move her island around the room, she added lockable casters to raise the height of the desk from 31³ to 34³. (For stationary islands, bun feet will work, too.) She drilled a pilot hole in each leg of the desk, screwed in threaded brass inserts, and then screwed in the casters.
4. Add a countertop
This will give you an easy-to-clean work surface and help the island feel like a cohesive part of the kitchen. Lesli selected a laminate countertop to match the ones in the rest of her kitchen. Measure the top of the piece, then give those dimensions to a countertop supplier to have a countertop cut to size. To attach her countertop, Lesli removed the desk’s existing top from its brackets, and screwed the countertop into them. (Another option: Use construction adhesive to attach the new material directly over the old top.)


