This content was originally published on OldHouseOnline.com and has been republished here as part of a merger between our two businesses. All copy is presented here as it originally appeared there.
When Roy Morton bought his 1910 bungalow in Birmingham, Alabama, adding a period-appropriate mantel was on the project list. The fireplace had been updated with a modern configuration: flat stones set beneath a cedar beam as a mantel shelf, and a raised hearth below. Morton owns a salvage store and makes regular buying trips to England-where he found an Arts & Crafts mantel rescued from a 1920s house. The oak piece has its original, gently worn finish. Details include carving and small shelf niches to hold books or knick-knacks.
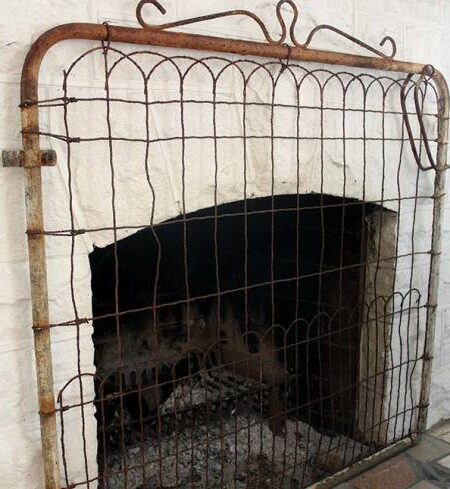
Owning a salvage store has its benefits: a rusty iron gate, refinished and retrofitted, became the firescreen. Roy Morton’s store is Architectural Heritage: architecturalheritage.com

1. MODIFICATION
The old mantelpiece was too short to meet fire-code requirements (which set the distance the wood mantel needs to be kept from the firebox). Morton created plinths at the bottom of the “legs“ to raise the height about a foot. The plinths are white oak, stained to match the mantel’s original, dark-oak finish. The wood was gently cleaned (Morton’s recommendation is Trewax Natural Orange Cleaner); always try cleansers first in a small, unobtrusive spot. After a buffing with a soft cloth, the mantel got a coat of Briwax in Tudor Brown.
2. THE HEARTH
A two-inch concrete bed was poured for the hearth and simple, gauged grey slate laid level. A light grey grout waschosen, and the slate was treated with a color-enhancer stone sealer in a matte finish, to protect against staining.
3. HANGING THE MANTEL
The wood mantel was securely attached to wall studs with 3³ wood screws, concealed with round oak plugs. Another option for hanging is to screw a horizontal beveled cleat to the wall studs (long point out), attach another cleat to the back of the mantel, and then slip it in place. It’s secure and the mantel will not twist or sag.
4. SLATE SURROUND
Gauged grey slate tiles were used as the surround, set above and below the firebox. A polymer-modified thinset mortar was applied to the wall, to which the slate tiles were affixed and secured with shims until set. The grout is the same grey as was used for the hearth. Once again, the slate was sealed for enhancement and protection.
The Firebox
Be sure to measure your firebox before you go shopping for a vintage mantel. Fire codes require wooden mantels be installed at least six inches above and to the sides of the firebox opening to prevent fires. Woodwork placed within 12 inches of the firebox cannot project more than 1/8³ for each 1³ from the opening. So be sure to have your measurements with you, and measure the mantel carefully before purchase. Consult with your contractor, too.