

![]()
Almost every homeowner can use a little more storage space. When you run out of room in the house and garage you have only two options: rent the space or create it. We’re going to create it by constructing a storage shed. Joe Truini, who co-hosts our Simple Solutions segment, has recently written a book (Building a Shed by Joseph Truini, The Taunton Press 2003) and he shares plenty of insights into the subject.
The project we’re following is a 12’x16′ Colonial style shed which is being built in Litchfield County, Connecticut by Better Barns, a company that specializes in the construction of small outbuildings. Joe explains that the sizing of the shed is the first consideration a homeowner should make. What will you use the building for? Be sure that you are allowing enough space for the activity or storage you envision for the shed.
The next consideration is location. Where will you site the shed on your property? Again, the end use plays an important role in this decision. Storage of often used items like children’s bikes is better done near the house for accessibility sake while a workshop or potting shed may benefit by being slightly isolated from the house.
In any case Joe says you’ll want to check with local building authorities to determine if and where you can build such a structure as well as what restrictions apply. Many people have a misconception that small structures don’t have to be permitted, but that is rarely the case.
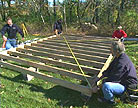
Our shed is being constructed with an on-grade foundation. This means the structure sits on top of the ground as opposed to having footings dug into the soil. This simplifies construction and reduces cost. The crew lays out the footprint of the shed on the site with concrete blocks, which will support the shed.
The location is not perfectly level so they use a builder’s level to establish how high the blocks should be stacked in each location (the blocks are spaced about every 4 to 6 feet under and around the perimeter of the shed.) If you’re doing this yourself you can use a four-foot level on top of a straight 2×4 stretched between the blocks. Each block (solid, not hollow block) must be level and well seated in the soil.
The guys from Better Barns dig up the sod before laying each block so they know it’s secure. On top of the blocks they construct the floor system using pressure treated 2×6 floor joists spaced on sixteen-inch centers. Next they nail down the 3/4″ floor decking on top of the floor joists (Better Barns uses tongue and groove plywood for extra strength.)
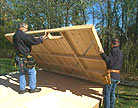
At this point we have a level 12’x16′ plywood deck that will support the shed and act as its floor. This is where the unique system these guys use comes into play. Pete Charest, the owner of Better Barns, explains that the walls and roof systems of their structures are prefabricated in their shop, so within minutes the walls are up complete with siding.
Once the walls are secured to the floor system and each other (they use long wood screws for added strength) the gables are set in place on either end. Between the gables (also complete with siding and overhangs) prefabricated trusses are set every two feet to support the roof decking.
Even the decking arrives on site pre-cut so it is simply set in place and nailed on. Pete explains that this system really speeds up construction (this shed was completed on site in less than 5 hours) but it is dependent on precise planning and exact measurements. For example, the siding was installed on the walls allowing for exactly enough overhang at the bottom to cover the floor joists once the walls were set in place.
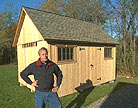
To complete the shed, the guys simply installed shingles and ridge venting on the roof and hung the windows and doors. This is another area where these buildings stand apart because Pete and his crew pay attention to little details like ornamental trim on the windows and high quality hardware on the doors. This shed even got a loft inside for extra storage capacity (2x6s were used for the horizontal members in the trusses to allow for this option).
Read also: Shed Window Essentials: A Comprehensive Guide
Sheds like this one are certainly more expensive than the small metal kit units you find at hardware stores but they are considerably more attractive and can be customized to suite your exact needs. If you’re interested in building a similar building yourself you can order plans directly from Better Barns or purchase Joe’s book Building a Shed (The Taunton Press 2003.)


